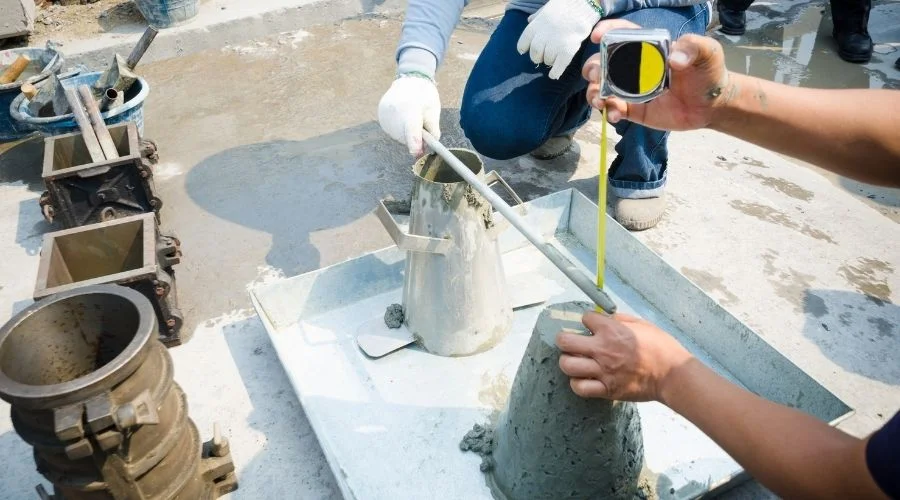
The concrete slump test is a field test used to assess the consistency of freshly mixed concrete by measuring the subsidence of a sample after the standard slump cone is lifted. It helps check consistency against the approved mix and placement requirements, but it does not directly measure compressive strength. This article explains the apparatus, test procedure, slump shapes, interpretation and common site errors.
What Is the Concrete Slump Test?
The test result is compared with the target consistency or acceptance range specified for the approved mix and placement method. A slump result alone does not confirm concrete strength, durability or compliance with every mix requirement.
Slump should be checked alongside the approved mix design and other concrete quality checks. For further reading, see concrete testing methods and quality control.
Importance of the Concrete Slump Test
The slump test offers a quick way to check consistency against the requirements of the approved mix. It can help site teams identify unusual changes between batches, but acceptance must follow the project specification. The test offers a practical check to:
- Assess concrete workability.
- Ensure uniformity in the concrete mix.
- Detect potential issues like segregation or excessive water content.
- Aid in achieving desired strength and durability.
Types of Slump
Concrete slump can be classified based on the nature of the concrete’s fall during the test. The three main types are:
1. True Slump
- Definition: The concrete subsides evenly, maintaining the shape of the mold.
- Significance: Shows a generally uniform subsidence pattern. Acceptability still depends on the specified slump range and mix requirements.
- Application: Ideal for most construction purposes.
2. Shear Slump
- Definition: One side of the concrete cone slides downward on an inclined plane.
- Significance: Indicates a lack of cohesion in the mix.
- Application: The test should be repeated or the batch assessed according to the applicable test standard and project acceptance procedure; do not make an automatic water adjustment based only on slump shape.
3. Collapse Slump
- Definition: The concrete collapses completely, losing all shape.
- Significance: Suggests excessive water or poor mix.
- Application: Requires immediate correction.
Zero Slump
Zero slump describes a very stiff concrete mix that shows little or no measurable subsidence after the cone is lifted. It does not mean the concrete is high-strength. Whether such a mix is suitable depends on the placing and compaction method and the project specification.
Procedure of the Slump Test
Conducting a slump test involves the following steps:
Materials and Tools Required
- A slump cone (metal mold)
- Tamping rod
- Measuring tape or scale
- Freshly mixed concrete
Step-by-Step Process
- Prepare the Cone: Place the slump cone on a flat, non-absorbent surface.
- Fill the Cone: Fill the cone in three layers, each approximately one-third of the height.
- Compact Each Layer: Use the tamping rod to compact each layer with 25 strokes.
- Remove Excess Concrete: Level the top and remove excess concrete.
- Lift the Cone: Carefully lift the cone vertically without twisting.
- Measure the Slump: Measure the difference in height between the top of the cone and the top of the slumped concrete.
Interpreting Slump Results
- High Slump: Indicates greater subsidence in this test. Whether it is acceptable depends on the specified target, mix design and whether segregation or bleeding is observed; slump alone cannot establish strength.
- Medium Slump: Ideal for most construction tasks, offering balanced workability.
- Low Slump: Indicates low workability, suitable for specific applications requiring stiff mixes.
Advantages and Disadvantages of the Slump Test
Advantages
- Simple and quick to perform.
- Requires minimal equipment.
- Provides immediate results.
- Applicable on-site for quality checks.
Disadvantages
- Limited to specific concrete types.
- Subject to operator error.
- Not suitable for very dry or very fluid mixes.
Common Errors in Slump Testing
- Improper surface preparation.
- Uneven filling of the cone.
- Incorrect tamping technique.
- Lifting the cone too quickly or slowly.
Table: Types of Slump and Their Characteristics
| Type of Slump | Description | Indication | Application |
|---|---|---|---|
| True Slump | Even subsidence | Good workability, cohesive mix | General construction |
| Shear Slump | One side slides down | Lack of cohesion | Adjust mix design |
| Collapse Slump | Complete collapse | Excess water, poor mix | Requires correction |
| Zero Slump | Retains mold shape | Very stiff, no workability | High-strength applications |
Best Practices for Conducting the Slump Test
- Use freshly mixed concrete.
- Perform the test in a controlled environment.
- Ensure all tools are clean and dry.
- Record results immediately for accuracy.
Conclusion
The concrete slump test is an essential tool in civil construction, offering insights into concrete’s workability and consistency. By understanding its types, procedure, and implications, engineers can ensure the quality and durability of structures, for the specified concrete placement. Maintaining best practices and addressing potential errors further enhances the reliability of this test, making it indispensable for modern construction projects.